NYC Blog
Latest News
Share
IMPORTANT: Modifying the registry in your computer could cause irrecoverable error if the modification is done incorrectly, therefore, it is very important for you to back up your registry first.
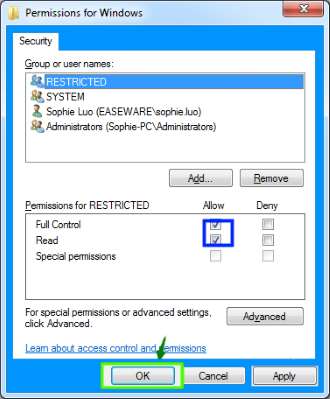
Step 6: Tick the box Allow for Full Control and Read,
then click Apply and click OK to save the change. reffer above Picture of "Permissions for Windows"
enable your system network wins NEBIOS over TCP and try for printer sharing.
Step 2. In run command type "\\ IP number of the Printer Server" if it works and you can able to see all the shared folders and printers, then you can install all the shared printer in your system.
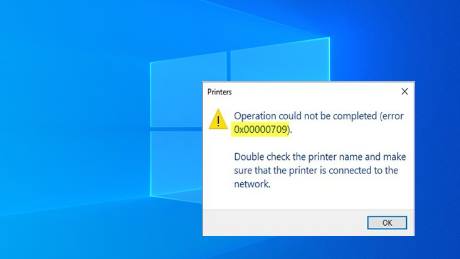
Printer Error 0x00000709 - Windows 7 / Windows 8 / Windows 10

Printer Error 0x00000709 when you try to Set as Default Printer
Many Windows users are reporting this 0x00000709 problem as well. it’s possible to fix it.
One of the most annoying issues with a Printer is the one where it refuses to get set up or configured on your computer. When it has configuration issues, one of the common errors that it throws is 0x00000709. This occurs if there is already a default printer set and configured or
Windows does not want to add or configure the new printer.
Fix for Printer Error 0x00000709
It will support - Win7 / Win8 / Windows10IMPORTANT: Modifying the registry in your computer could cause irrecoverable error if the modification is done incorrectly, therefore, it is very important for you to back up your registry first.
Step 1: Hit the WINKEY + R button combination to launch the Run utility, type in regedit and hit Enter.
Once Registry Editor opens, navigate to the following key location
Step 2: HKEY_CURRENT_USER\Software\Microsoft\Windows NT\CurrentVersion\Windows
Step 2: HKEY_CURRENT_USER\Software\Microsoft\Windows NT\CurrentVersion\Windows
Step 3: Now, under the Windows folder, double-click on the file named Device on the right-side pane.
Add the name of your printer inside the Value Data
Example Priner Name / Device Name
HP 1020
canon lbp 2900
.
.
.
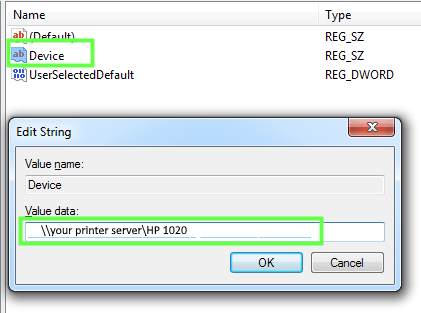
if the printer is not shared printer you just enter printer name alone
Example Priner Name / Device Name
HP 1020
canon lbp 2900
.
.
.

if the printer is not shared printer you just enter printer name alone
Step 4: Click OK to save the change.
Note: If you encounter this sort of error "Cannot edit Device: Error writing the value’s new contents", please follow the steps below to set the permission of the key.
Note: If you encounter this sort of error "Cannot edit Device: Error writing the value’s new contents", please follow the steps below to set the permission of the key.
Step 5: Right Click on the windows folder
refere the path :HKEY_CURRENT_USER\Software\Microsoft\WindowsNT\CurrentVersion\Windows.
Click "Permission" Option from the Popup Menu.
refere the path :HKEY_CURRENT_USER\Software\Microsoft\WindowsNT\CurrentVersion\Windows.
Click "Permission" Option from the Popup Menu.

Step 6: Tick the box Allow for Full Control and Read,
then click Apply and click OK to save the change. reffer above Picture of "Permissions for Windows"
Step 7: Once you have done that, right-click on the file named as UserSelectedDefault and select Rename and then rename it to your printer’s name.
Step 8: Reboot your computer for the changes to take effect.
Step 8: Reboot your computer for the changes to take effect.
Step 9:After Rebooting you need to update your printer driver for it to work more smoothly
Note:- Once you have added the printer, remember to reverse the Permission changes you made. This is in the interest of security.
Printer Error 0x00000709 when you try to share a printer
Step 1 : Check with the printer server system in sharing mode Example : in run command type "\\Your Printer Server Name" if it works and you can able to see all the shared folders and printers then do the followingsenable your system network wins NEBIOS over TCP and try for printer sharing.
Step 2. In run command type "\\ IP number of the Printer Server" if it works and you can able to see all the shared folders and printers, then you can install all the shared printer in your system.
if you are not able to install a shared printer, all above steps are faild, and then do the followings
In server side
Step 1: Check for TCP/IP => Inernet Protocol Version 4
Step 2: Configure Manual IP instead of Automatically IP Assign.
Step 3: Check with your Printer server Name, (Compurter or PC Name)
It should not have a long name or special characters or Numbers alone
set relavent name for it.
Allowing server machine to use filesharing with itself via the DNS Alias
Step 4: Check / Configure Network Sharing Rights for the printer (and Update Printer Driver).
Step 5: in Client PC using run command type "\\IP number of Printer Server"
Step 6: now you are able to view all the shared folders and printers to Install.
All the best!
Menu Items
Latest Post
/Latest News
/Latest News
/Latest News
/Latest News
/Best New York attractions
 ( 5 ) by 1 User(s).
